Friday, February 22, 2013

Lazy Morning French Toast Mash (GF/DF options)

I had 2 gluten-free dinner rolls that were hard as a rock but I sure didn't want to toss them out!  So this morning I whipped together a "mash" similar to a french toast bake. There are TONS of delicious french toast casseroles out there, but this one took all of 10 minutes and tasted great to me.


Next time you have some crusty bread that you are about to throw out, think again and turn it into a delicious breakfast.  You can use any kind of bread.

Enjoy!

This is for ONE SERVING:


2 crusty dinner rolls or any other kind of bread
1/4-1/2 cup of milk or milk alternative
1 egg
1/2-1tsp of vanilla extract.  (I used a full tsp)
1/2 tsp of cinnamon
1 tsp of honey
1 tsp of butter or EVOO  (I used my blood orange EVOO from Heavenly Olive Oils/Vinegars)
pinch of nutmeg (optional)
pinch of salt (optional)
1 heaping tbsp of ground flax

TOPPINGS:  maple syrup, flavored Balsamic Vinegar, dried cherries, fresh blueberries, pecans, etc.

1. Whisk all the ingredients MINUS the bread and flax in a small bowl.  (I mixed mine all up in the same pan...what can I say?  That's why this is called LAZY morning mash!)

2.  Break up the bread into small bite-sized pieces and place in a small skillet.  Pour the milk mixture over the bread.  Allow to sit for about 5 minutes so bread can "soak up" the liquid.  (stir it around every minute or so)


3.  Turn on stove top to medium heat and cook until the liquid is gone.  It will be very mushy.

4.  Turn into a bowl and top w/ ground flax, syrup and some extra yummy-ness like dried cherries or fresh blueberries!


Wednesday, February 20, 2013

White Wine Garlic Cream Sauce (pour over pasta, steak, or chicken)

You've got options...this can be low fat, gluten-free, dairy free, and/or vegan!  Experiment to see how you like it best.  My man loves it w/ real organic whipping cream, herbs and mushrooms served over a juicy steak.

Ingredients:

2 tbsp of butter or EVOO
2 tbsp of whole wheat flour OR GF all purpose
1 tsp of onion powder
4 cloves (or so) of garlic
1 cup of Chicken or Beef Broth
1/2 cup of white wine OR use more broth
Sea Salt/Pepper to taste
2 tsp (or so) of lemon juice
1/2 cup of organic heavy whipping cream, skim-milk ricotta (for a lower fat version), or Trader Joes Coconut Cream (comes in a can)

1.  In large skillet, melt your butter/oil and sprinkle in onion powder.  (NOTE:  if using mushrooms, sauté during this step)
2.  Whisk in the flour and cook for additional 2-3 minutes until it darkens up a bit.  (whisk continuously)
3.  Continue to whisk as you add 1 cup of broth and the minced garlic.  If adding any herbs, you can toss those in now, too.  Turn up the heat to medium high and bring to a rolling boil.  Keep whisking!  (sauce will begin to thicken up)
6.  Let boil for about 5 minutes and add the wine and/or broth. Turn down heat and simmer to let the liquid reduce.
7.  Once the consistency is to your liking (no right or wrong) add the lemon juice and cream.  Whisk really good and once heated through serve over a yummy steak, chicken, or some pasta.


OPTIONS FOR MORE FLAVOR:  use herbs like rosemary, basil, or HERBS DE PROVENCE which is what I used.  Sooooo good!

MUSHROOMS:  This is a delicious sauce to incorporate mushrooms in...saute in step 1.


Friday, February 15, 2013

HOMEMADE ROSE WATER RECIPE

NOTE:  MAKE SURE YOUR ROSES HAVE BEEN FARM GROWN (not imported) TO AVOID HARMFUL PESTICIDES!!!
Make your own rose water or oil at home with this method. You can make other herb extracts as well. You will need a lot of ice for this project, so plan ahead.  ONCE YOU'VE MADE YOUR ROSEWATER, CLICK HERE FOR RECIPES AND IDEAS OF HOW TO USE IT! 

Prep Time: 15 minutes

Cook Time: 3 hours

Total Time: 3 hours, 15 minutes

Ingredients:

  • Clean rose petals or herbs (grown without pesticides)
  • Water
  • Ice

Preparation:

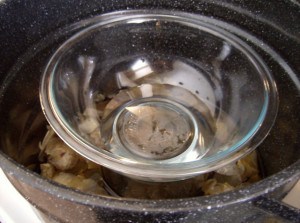
I put a pyrex bowl on top of an inverted pyrex bowl. This increases the likely hood that the bowl will catch the condensation that drips down from the inverted lid:
Rosewater
Yield: 2 -4 cups
Prep Time: 5 minutes
Cooking Time: 2 hours
Ingredients:
8 cups loosely packed freshly picked rose petals
6 – 8 cups of distilled water
ice
Directions:
Rinse the rose petals.
Place a heat proof bowl in the center of a large pot ( I use my enamel canning pot). If you want you can place the bowl on top of another heat proof bowl that has been inverted (this will raise the bowl closer to the top of the pot).
Place the rose petals around the bottom of the pot, making sure not to get any in the bowl.
Cover the rose petals with the water, making sure not to get any in the bowl.
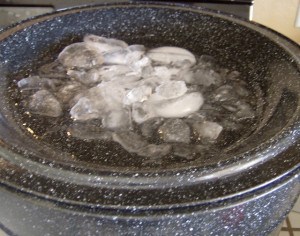
Place the lid on the pot upside down and fill the depression with ice. ( Be careful not to put in too much ice; you don’t want it to overflow when it melts).
Cook over a medium-high heat until the water begins to boil. Then lower the flame and simmer for up to 2 hours. Replace the melted ice with fresh ice as needed. Make sure the water doesn’t boil down. If it gets too low add some more distilled water.
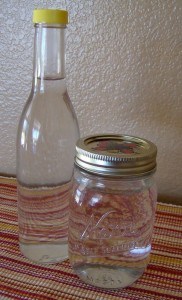
The water that collects in the bowl is your rose water. Transfer it to a sterilized bottle or jar. The rose water will keep in the refrigerator for up to a month.

IDEAS OF HOW TO USE ROSE WATER

Did you get some roses for a special occassion?  Do not, I repeat, do NOT throw those roses in the trash.  There are literally HUNDREDS of recipes you can use rosewater for...here are a few you could scroll through.  The first half are FOOD recipes and the bottom half are SKIN CARE recipes.  NOTE: MAKE SURE YOUR ROSES HAVE BEEN FARM GROWN as many imported roses have harmful pesticides that can cause serious problems!


SCROLL DOWN TO THE VERY BOTTOM TO SEE MY FAVORITE LOTION RECIPE!


FOOD RECIPES:


1.  Rosewater Lemonade
  http://globaltableadventure.com/2012/08/12/recipe-rosewater-lemonade/


2.  Rosewater Rasperberry Cupcakes  http://www.celebrations.com/content/raspberry-rosewater-cupcakes

3.  GLUTEN FREE Rhubarb and Rosewater Crumble  http://www.cookrepublic.com/recipe-archive/rhubarb-and-rosewater-crumble/
4.  White Chocolate and Rosewater Cupcakes http://tastedbytwo.com/2009/11/04/recipe-white-chocolate-and-rosewater-cupcakes/

5.  Rosewater/Plum Compote  http://www.101cookbooks.com/archives/rosewater-plum-compote-recipe.html

6.  Rosewater Icing (for your favorite cake or cupcakes)  http://www.homelife.com.au/homes/food/raspberry+cupcakes+with+rosewater+icing,3595
7.  Watermelon and Rosewater Punch (or use any other kind of red fruit such as frozen strawberries/raspberries, etc)  http://sumptuousspoonfuls.wordpress.com/2012/06/09/watermelon-rosewater-slushies/


SKIN CARE IDEAS:


1.  No-Nonsense Daily Facial Scrub (I use this all the time!)  http://www.crunchybetty.com/no-nonsense-daily-scrub-for-any-skin-type

2. Rosewater and Coconut Milk Relaxing Bath Treatment: Rosewater and coconut milk make the most relaxing and soothing bath. The therapeutic scent of the rosewater is so relaxing and the creamy coconut milk will make your skin super soft and silky. Throw a quarter cup of rosewater into your bath with a quarter cup of coconut milk and soak the stress away. 

3.  Lavender Rosewater Mist:  Use on face, sheets/linens, room spray


uses
This basic recipe has so many uses! Use it to freshen linens, as an herbal air freshener, as a hair tonic, or as a facial spritz (try refrigerating it). 

ingredients & directions
1 ½ cups distilled water
½ rosewater (available in pharmacies)
50 drops lavender essential oil

Combine all ingredients into a clean spray bottle. Shake before use. 


4.  Honey and Rosewater Facial Mask  http://pixiwishesforeheadkisses.com/2012/09/04/diy-beauty-toning-rosewater-and-honey-mask/


5.  Rose Lip Balm  Lip balm ~ Melt 15 g beeswax or shea butter. Remove it from the heat, add 12 ml sweet almond oil, about 5-10 ml rosewater and one drop of essential lemon oil. Pour it in small pots and allow to cool.


7.  MISTY'S FAVORITE LOTION/CREAM RECIPE:

Though this recipe appears "easy" at first glance, it takes practice to get it just right...but trust me when I say, it is WELL worth it.  Not only is it WAY cheaper than storebought creams/lotions, it is TONS better.  My skin "drinks" it in and it is safe to use on body AND face.  Package your cream in glass jars.  I use mason jars or glass jars I purchased from Hobby Lobby for just a few dollars.  IT DOESN'T NEED TO BE STORED IN FRIG but in summer it feels fantastic and it will HAVE A LONGER SHELF LIFE if you do store it in the frig.  I put about a weeks worth in a small jar in my bathroom and put the rest in our refrigerator.

WATERS:

2/3 cup of rosewater or distilled water
1/3 cup aloe vera gel (NOT the blue junk...real, pure aloe)
1-2 drops essential oil of your choice
a little splash of Vit E oil

OILS:

3/4 cup of apricot, almond or grapeseed oil
1/3 cup of coconut oil or cocoa butter
1/4 tsp of lanolin
1/2 to 1 oz of beeswax (you can purchase online...I use our own from our bees but you can buy off amazon or mountain rose herbs website)

1.  Combine the waters in a glass measuring cup.  Set aside.
2.  In a double boiler over low heat, combine the oils.  (I put the oils inside a mason jar and then set the jar in boiling water on the stove).  Heat them JUST ENOUGH TO MELT.
3.  Pour the oils ONLY into a blender and LET THEM COOL TO ROOM TEMPERATURE.  This cooling process is IMPERATIVE.  The mixture should become thick, creamy, semisolid, and cream colored.
4.  When the mixture has cooled, turn on the blender ON THE HIGHEST SPPED.  In a slow, thin drizzle, pour the water mixture into the center of the vortex of the whirling oil mixture.
5.  When most of the water mixture has been added to the oils, listen to the blender and watch the cream.  When the blender coughs and chokes and the cream looks thick and white, like buttercream frosting, turn off the blender.  You can slowly add more water, beating it by hand w/ a spoon but DON'T OVERBEAT.  The cream will THICKEN as it sets.
6.  Pour cream into glass jars.  Store in a cool location.

NOTE:  If you have problems w/ seperation of the water/oil, it is more than likely due to the oils not cooling completely to room temperature.  You can start the process all over again in the blender or just give it a vigorous shake in the jar.

Wednesday, February 13, 2013

Avocado Chocolate Cupcakes...Decadent and Easy!

Ingredients:

1 cup avocado puree (blend in food processor or blender w/a  little water until smooth)
1 cup sucanat or brown sugar  (Sucanat is non-refined sugar cane still containing the natural molasses.  You can find it in your local health foods store or organic section.  We buy ours at an Amish store...a 50 pound bag lasts a LONG time and is MUCH cheaper!)
1/4 cup honey, maple syrup, or agave nectar
1 cup of milk or milk alternative
2 tsp of pure vanilla extract
1/2 tsp of balsamic vinegar
2 large farm fresh eggs
1 3/4 cup of flour of your choice....we use spelt, almond, oat and a GF flour blend by Namaste)
1/2 cup of cocoa
1 tsp of baking soda
1/2 tsp of sea salt
*OPTIONAL:  toss in 1/4 cup of ground flax
2 small handfuls of chocolate chips

1.  Preheat oven to 350 and spray muffin cup liners.
2.  In large mixing bowl, beat avocado, sucanat, honey, milk, vanilla extract and balsamic vinegar until smooth.  Add eggs 1 at a time and beat just until incorporated.
3.  Dump in all the dry ingredients (except choc chips) and mix well.
4. Add the chocolate chips.
5.  Bake 22-24 minutes or until top springs back.

ALTERNATIVE TO FROSTING:  my kids LOVE these topped w/ some vanilla yogurt and few sprinkles!

Enjoy!

Saturday, February 9, 2013

Gluten Free Conversion Chart

Use this simple chart as a 'QUICK LOOK-UP' guide to your favorite recipes.  NOTE:  depending on the recipe, you may need to use different types of flours other than the ones mentioned.  As I've said a million times before, cooking/baking GF means lots of experimenting but this is a good start.


Tuesday, February 5, 2013

RAW VEGAN COOKIE DOUGH BITES (Gluten/Dairy Free)

2 1/2 cups almond meal (feel free to use Gluten Free Oat Flour mixed w/ Almond Meal, too)
1/2 tsp sea salt
1/2 cup EVOO or Coconut Oil (I use a mix of both)
1 tbsp vanilla extract
1/4-1/2 cup of agave nectar, maple syrup, (or raw honey) (start w/ 1/4 cup, taste dough and add more until you reach preferred sweetness.  I usually end up using about 1/4 cup plus 1-2 tbsp)
1 cup dark chocolate chips OR dried cherries
1/4 cup of raw chia or ground flax
*Optional: unsweetened coconut flakes

Combine dry ingredients.  Stir wet ingredients together in separate bowl and then add to dry.  Form balls and chill...or just put in an air tight container and form balls when ready to serve.

These are delicious and my kids can't get enough!  Love all the raw goodness they are getting when they snack on these!